


A 2025 industry report shows that indie developers had a 70% failure rate. And the reason that comes up most often has nothing to do with bad design or poor marketing. One of the named causes is going from an idea to testable example, simply because it is hard to afford for solo developers. Game prototyping, which is the thing that’s supposed to help, somehow became a huge wall for itself.
That’s a classic paradox for the indie development industry. If you want to test your idea and see if it can work after all, you need a working build. A working build requires time, money, or a team you don’t have. So it is to just abandon that idea, never having it tested.
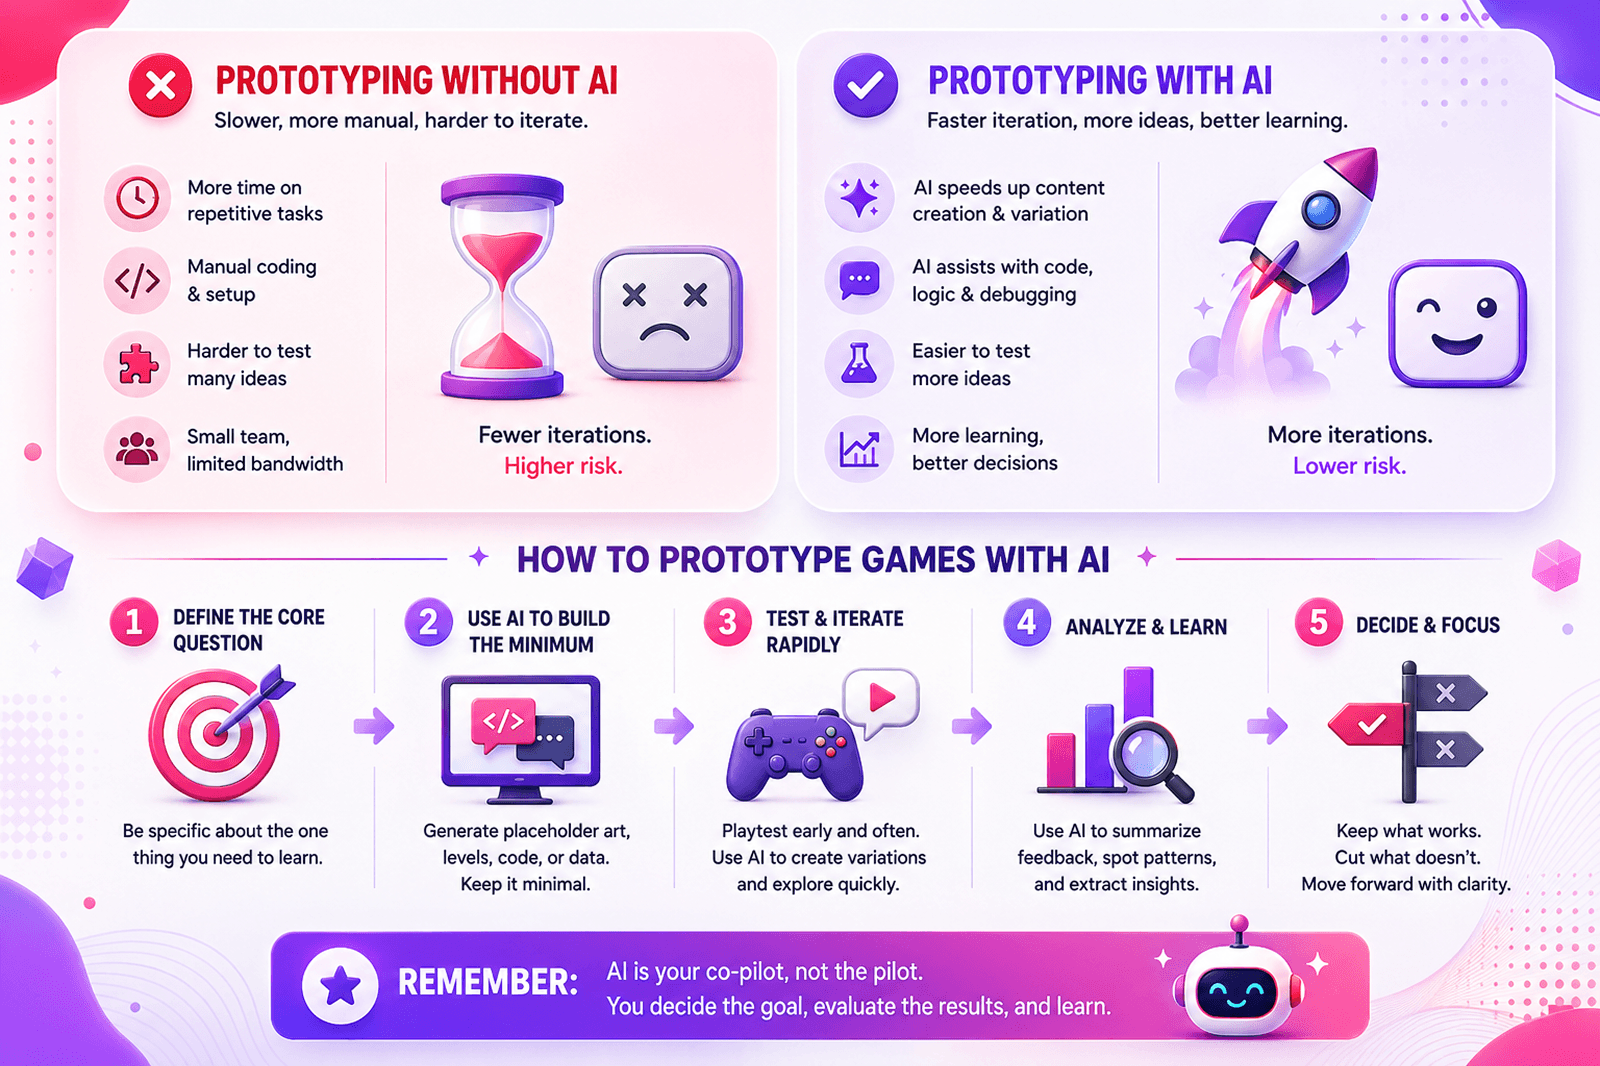
Since AI has become an integral part of the game development process, it can really address this issue.
In the past, you would need the whole game development prototype team of four or five people. Now, one developer can do the same job much faster with the right AI toolkit at hand. The economics changed a lot in the last two years as well. It does not mean that AI writes perfect code or generates production-ready assets, but it makes a transition between concept and testable thing very easy and short. AI takes care of repetitive parts of work and allows us to experiment more quickly.
In this article, we’ll explore how to prototype a game as an MVP, so you’re not building more than you need to test. We will also learn which AI tools earn their place at each stage of the process. Read on!
Key Takeaways
- Video game prototyping is all about answering one gameplay question as fast as possible.
- Rapid game prototyping works best when developers set the deadline first, then decide what fits inside it.
- Learning how to prototype a game with AI means setting up documentation files before writing your first prompt.
- When prototyping on a budget, the full AI stack costs between $0 and $50/month depending on how much you lean on open-source tools.
- Game prototyping starts at the concept stage; you can use LLMs for GDD drafts, feature classification, and playtest design before you start doing anything else.
- Define success criteria before you build, because a game prototype with AI is only as useful as the question it was designed to answer.
How to Determine the Scope of Work for an MVP
Ask any developer why their game development prototype is taking that long or stopped on an early stage, and the answer wouldn’t be technical. In most cases it is a question of scope.
Developers usually start building before they know what question they are trying to answer and when they have a half-finished inventory system, they still don’t possess any idea whether the core mechanic actually worked. This is what game prototyping would help with.
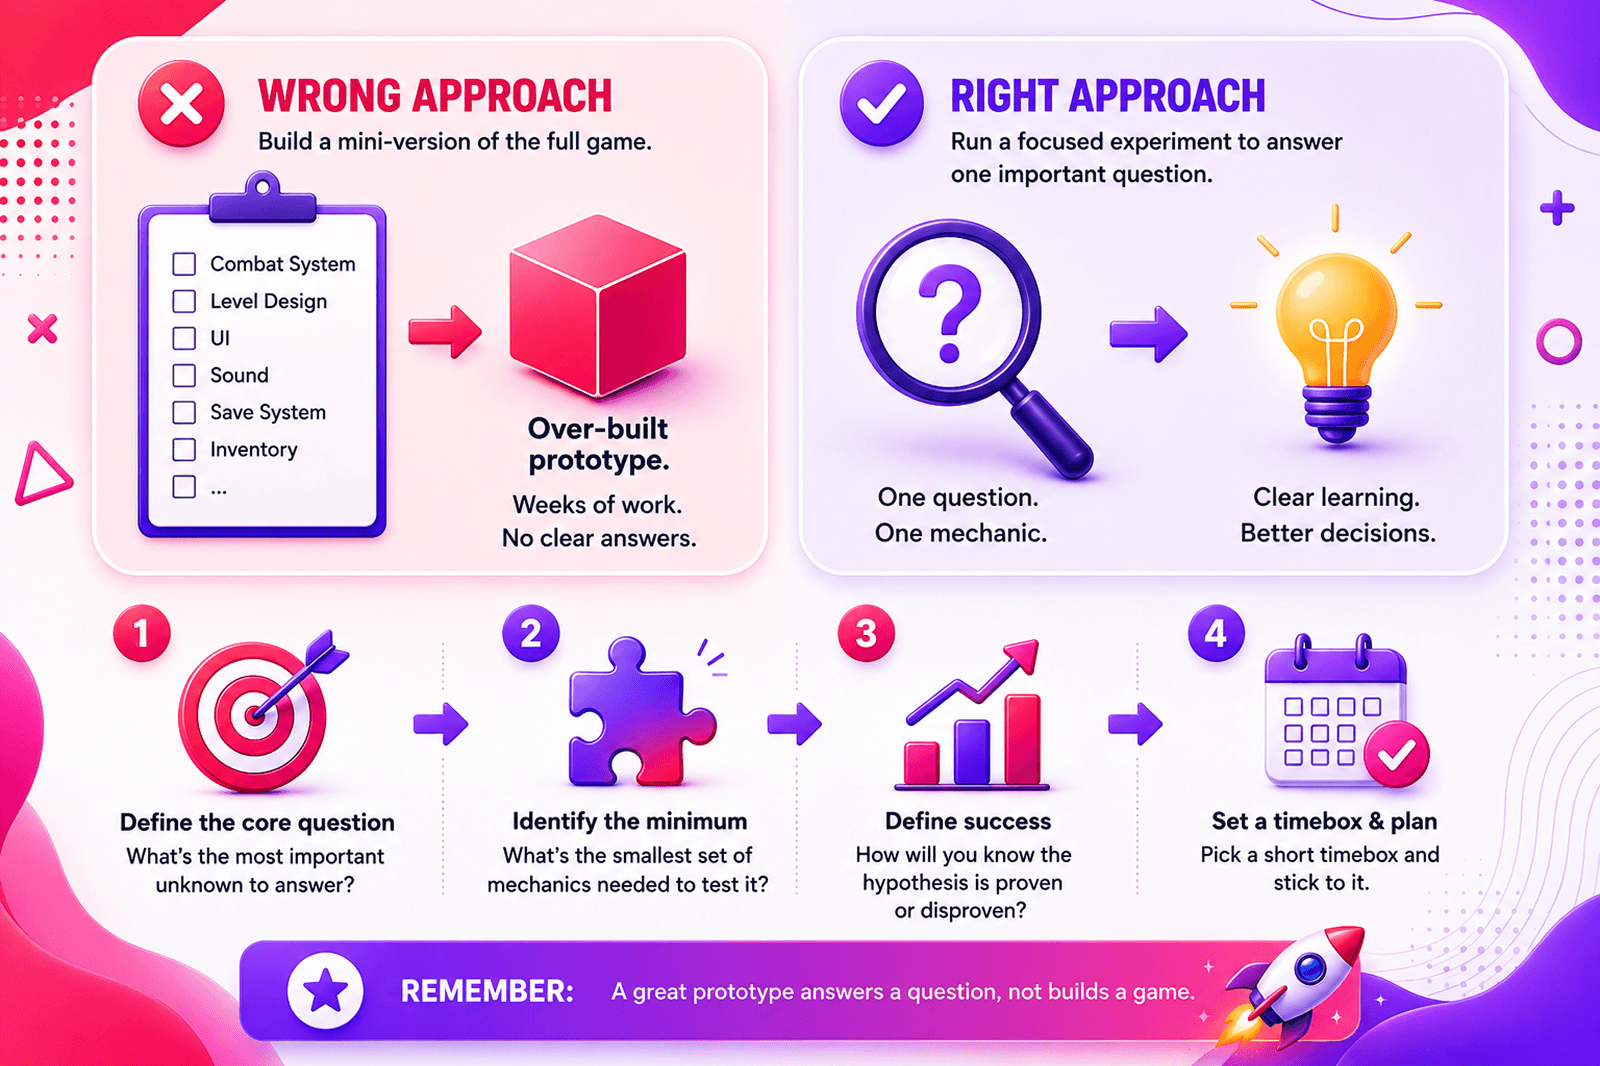
This is the central failure mode in AI game prototyping. Very often developers see a prototype as a small version of a finished game, while it would be more beneficial to approach it as an experiment, designed to answer one specific question. In the current approach all the efforts result in an over-built prototype. And that costs weeks of work and does not really prove a thing.
What’s wrong with this approach? It looks like a feature list (combat system, level design, UI, sound, save states), but in reality, it’s more of a production backlog.
The right approach to prototyping games needs only a single testable hypothesis. For example, it can be “Does turn-based combat feel rewarding when the player is outnumbered 3-to-1?” This hypothesis has one question and one mechanic, and it answers an important thing, useful for a future game. Let’s see how you can scope any game design prototyping sprint in under two hours with our four-step framework.
Step 1: Define the Core Question
The Core Question is just one sentence: “Does [mechanic] feel [emotional response] when [specific condition]?”
If you are used to a more elaborate, complex issue in the core question, don’t rush to dismiss this one. The discipline of collapsing your concept into one sentence is a good thing because it makes you focus on one thing. It might be the main thing you are betting on. The one mechanic assumption that, if wrong, makes everything else unimportant.
Game design prototyping is also one of the most useful places to involve AI as early as possible. Describe your game concept to ChatGPT or Claude and ask it to identify just one important mechanic that might be useful to test. For example:
“I’m building a stealth game where light levels determine detection. What is just one most important mechanic assumption I should test in a prototype first?”
Don’t expect a perfect answer, but treat it like a possibility to think for yourself on the outcome. If it shows you an assumption you thought is settled, go back to it. You can keep talking to AI on the topic before you get to the core question, and you’ll see a lot more ways of answering how to prototype a game.
Step 2: Identify the Minimum Features
The next task is dividing the features you need from the features you want. It is not easy at all; some might say this is the hardest distinction to make. But there’s a psychological reality behind it. Every feature on your want list can look essential the moment you think of it. But in the game itself it turns out to be less important.
To understand just how far a complete game sits from a prototype, it helps to look at the full picture. You can use our Building a Game Checklist to the real scope of a game. It shows you the finished game with technical parts. These include UI systems, audio pipelines, save/load logic, input handling, platform certification requirements, etc.
Your prototype does not need all of these things. Just one part of it, something that would help you to test the Core Question and nothing else.
To understand whether you are still on the right path, you can ask yourself “If this feature is missing, can I still test the Core Question?” If yes, good then.
After this, use the feature budget. You need to learn here time estimates to finish each feature that remains. If something takes longer than you planned your sprint length, cut the most time-consuming features. At this point, you should only care about time planning.
AI makes rapid game prototyping easier. Feed your GDD description to Claude or ChatGPT and ask it to generate a feature list, then ask it to classify each feature as either “required to test core loop” or “production feature.” This is worth at least in order to have some extra thought from the side.
Step 3: Set a Time Budget
If there’s no deadline, a prototype will keep growing without stopping. There’s always one more feature that seems to be necessary, and every developer will find one more thing to polish over and over again. But if you put a two-week cap, you will treat a prototype and your time more mindfully.
For rapid prototyping game development, you can use these:
- Solo developer: 2 weeks maximum
- 2–3 person team: 3–4 weeks maximum
- 4+ people: at that point, you’re likely in early production, not prototyping
The approach requires you to set the end date, and then fill this time with what you can realistically build.
For a solo two-week sprint, a practical daily structure looks like this:
- Days 1–2: GDD and scoping (AI-assisted)
- Days 3–5: Core mechanic implementation (code only, no art)
- Days 6–9: Placeholder assets and integration
- Days 10–12: Internal playtesting and iteration
- Days 13–14: External playtest session and findings documentation
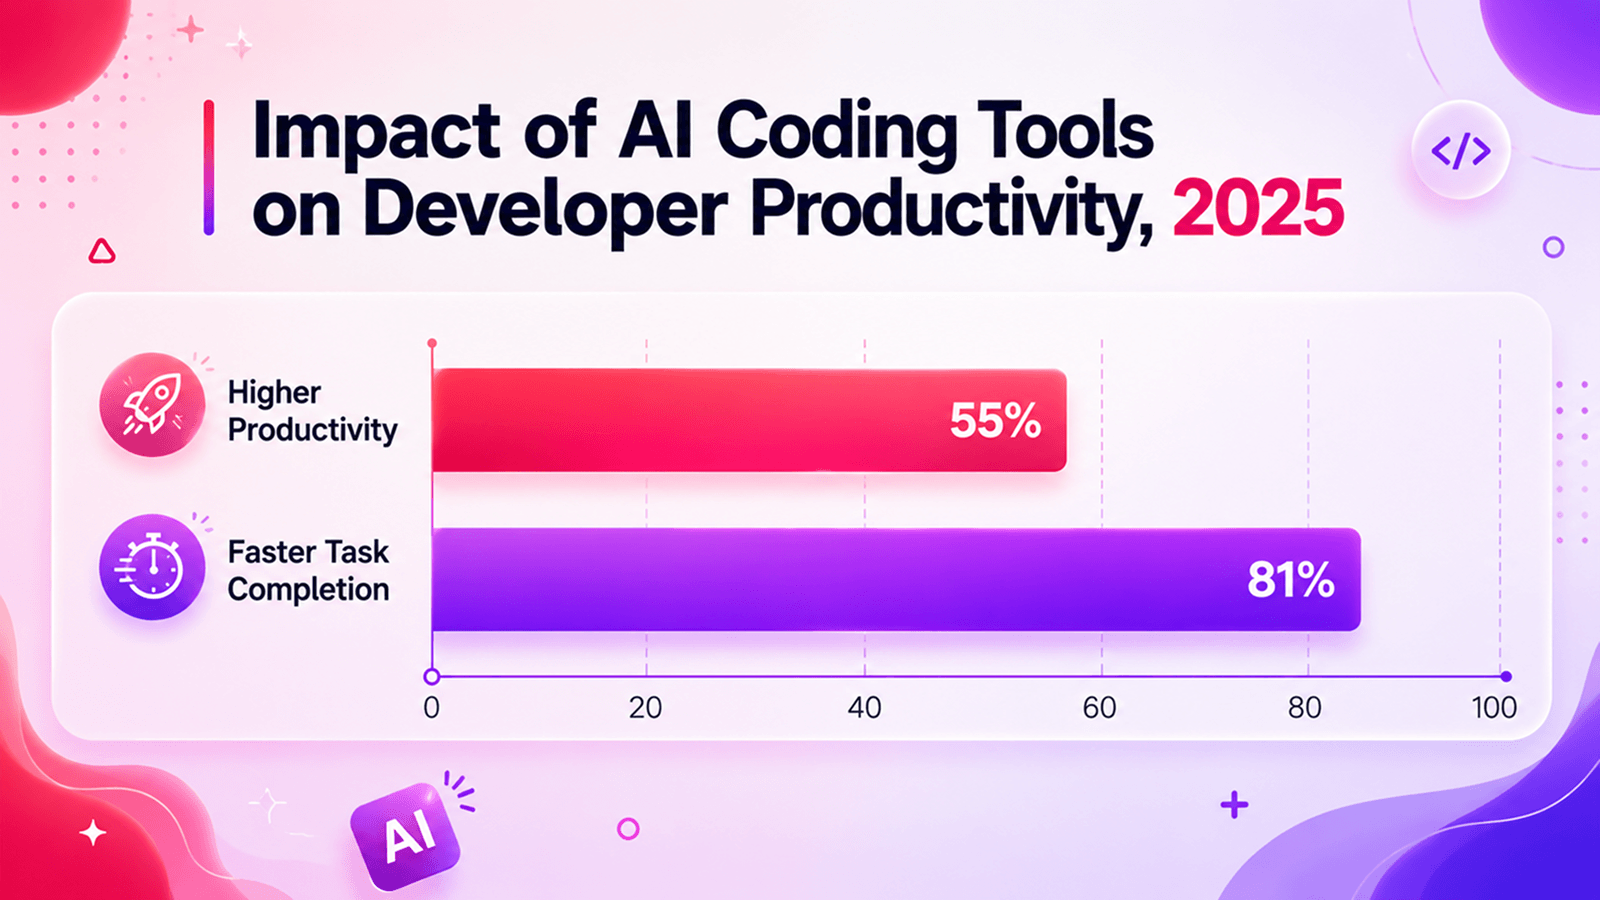
Tasks that take 3 hours roughly take no more than 45 minutes if you are using AI coding tools. This is what we call rapid prototyping game development.
Developers report that with AI coding tools, repetitive work goes about 3–4x faster, which makes an enormous difference for the whole project.
Step 4: Define Success Criteria
Very often, developers end a game development prototype when they run out of time. It shouldn’t be like that. The idea of the prototype to end is when it has answered the Core Question.
Success criteria in video game prototyping need to be specific and measurable. They come from watching what players do, because asking what they think at this point is more about testing their analytical skills which is not what you need. Here’s the difference in practice:
- “5 out of 7 playtesters attempt the wall-jump a second time within 60 seconds of discovering it” – it is a behavioral variable. It shows that a mechanic is engaging enough to make people return to it organically.
- “Average session length exceeds 8 minutes without any instruction from the developer” – this is also a good sign, engagement is totally working.
- “Players say they enjoyed it” – this is not a success criterion. It’s too vague, not measurable, and heavily influenced by social courtesy. People tell developers their games are fun because saying otherwise… feels rude. And you won’t know if your game design prototyping was actually effective.
When criteria are met, you know that the mechanic is validated. Proceed to MVP scoping with real confidence behind you. When they aren’t met, you don’t start production, because either revision is needed and a second sprint, or you have to pivot the hypothesis. If you have to turn to one of these, it does not mean you failed. The whole idea of the prototype is to find the best way of moving forward.
AI can also help you design the playtest questionnaire itself. Give it your Core Question and ask it to generate five behavioral observation criteria and three post-session interview questions. In this way, you will have something to rely on and save your time.
AI Assistance in the Scoping Phase
Before moving into the build, it’s worth naming the tools relevant specifically to scoping.
ChatGPT / Claude / Gemini works with the document layer. It can be used, as we said before, drafting a GDD from a concept description, classifying features, refining the Core Question, generating playtest questionnaires. Most of this is free or low-cost, and it saves hours of work.

Once the scope is defined and the sprint is structured, on the next step you have to start building. It is also important to know which AI tools belong to which phase.
Did You Know?
Will Wright, the designer behind SimCity, The Sims, and Spore, calls rapid game prototyping “the central discipline of game design.” For Spore, his team used paper prototypes to test the creature evolution mechanics before writing a single line of code. Game prototyping doesn’t always have to be digital.
Key Stages of AI Game Prototype Development
If you want to make the whole process of prototyping games easier, make sure you don’t skip stages. AI might feel like it can close the gaps and let you “cheat”, but we highly recommend being serious about every single step.
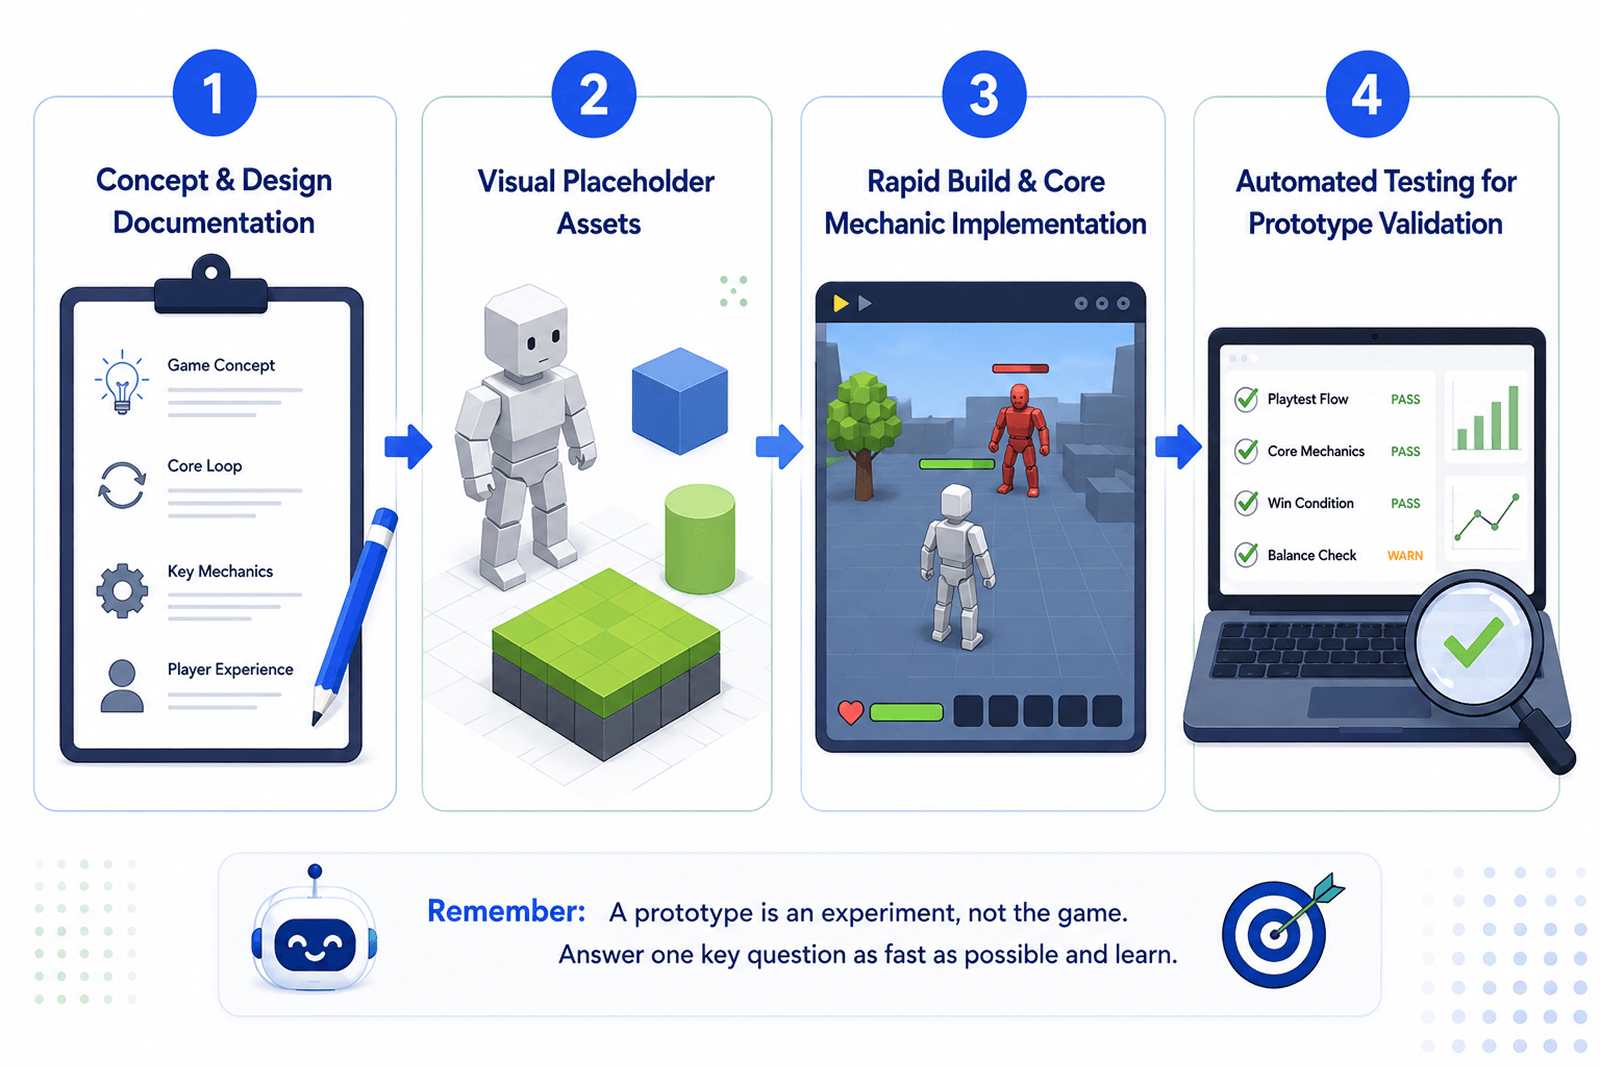
Stage 1: Concept & Design Documentation
AI game prototyping starts very early, and concept creation is the best phase for introducing Artificial Intelligence instruments.
It is typical for many developers to treat documentation as something you have to write after you learn what to build. In an AI-assisted workflow, that won’t work. What you write at this stage determines what the AI produces later, so this documentation is nothing but the instruction set.
ChatGPT and Claude are useful for GDD drafts and placeholder narrative. Describe your concept in plain language, ask for a structured design document, and you have a working skeleton that takes less than an hour. Iteration speed is great, so you test five different mechanic directions in the time you would otherwise spend writing just one.
Before locking anything in, run the concept through Ludo.ai. Take a good look at data from similar games. Ten minutes here can tell you whether the space you’re building into is still worth it.
The most important output of this stage of building an AI game prototype is technical documentation. It is easy to cut corners here, but you will pay for it later, in inconsistent code, broken asset pipelines, and Artificial Intelligence outputs that don’t talk to each other.
Before writing a line of code, you need to define: which assets are required, their formats, resolutions, dimensions, and naming conventions. You need to know coding standards and architecture rules, as well as testing requirements. Make sure UI/UX guidelines are not unknown to you as well.
Stage 2: Visual Placeholder Assets
A prototype does not need polished art. This sounds obvious, but it’s one of the most common places developers lose days. Everyone wants the game to look like a real one before they know whether it plays like one. That’s production thinking that is also too idealistic. When you are building an AI game prototype, you don’t need this, that’s all.
What a prototype needs is to be readable and functional. Can the player tell what’s a wall, and what’s a floor? Can they distinguish an enemy from a collectible? If yes, the visuals are doing their job.
Generating even rough placeholder art manually takes time you don’t have. Here’s what Artificial Intelligence can do here:
Layer helps to create game asset production. 2D, 3D, and video game assets designed to fit into studio pipelines.
Ludo AI generates 3D assets and videos from text prompts. Describe what you need, get a 3D model, and you can use it in your engine. The output works in Unity or Unreal, and it does not require anything additional.
Both tools have free tiers, so you can explore how capable they are before paying for the tools. But if the cost is too high, Stable Diffusion running locally brings it to zero. Of course, there are some downsides to it, but it is still efficient.
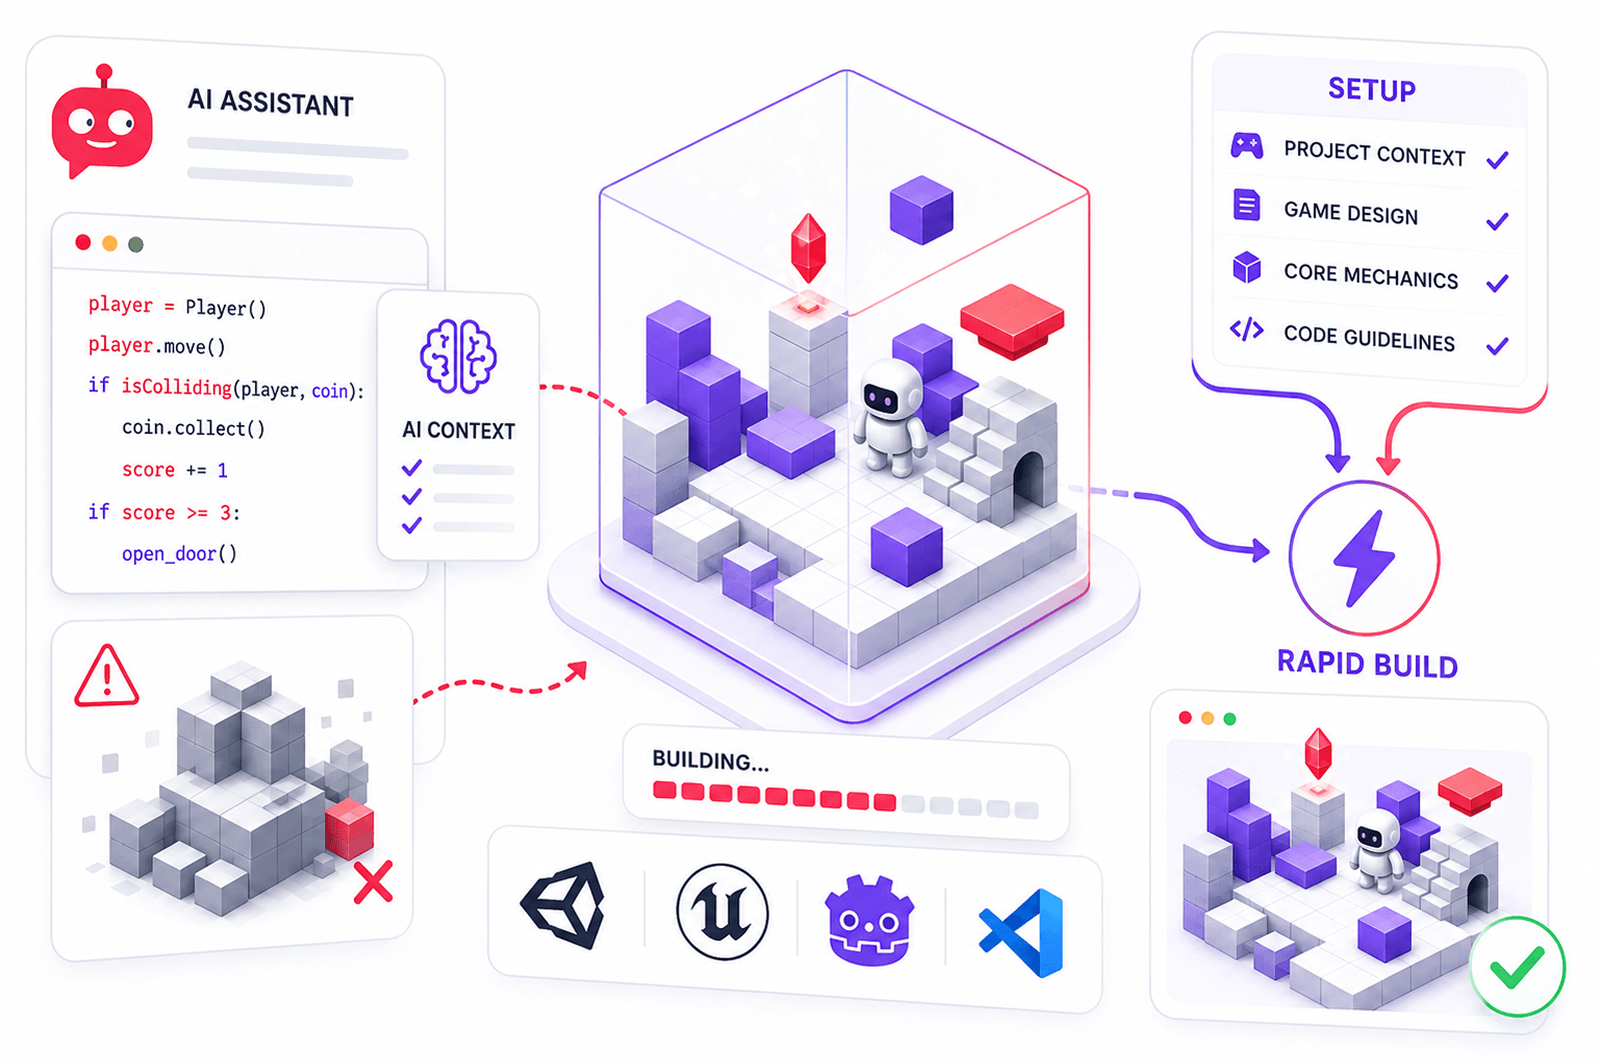
Stage 3: Rapid Build & Core Mechanic Implementation
That’s the stage where you build a prototype for real.
Since developers are doing that with AI tools, what matters now is how they set them up. An AI coding tool given no context will write generic code that will run from a technical point of view, but its real output will be hollow. That’s why it is vital to work on setup fastidiously.
Frameworks with AI integration
Rapid game prototyping begins with the engine and toolings. Several frameworks either have native Artificial Intelligence integration or work well with AI coding assistants:
- Unity – integrates with GitHub Copilot in the editor; also works well with Cursor for external AI-assisted coding against the project structure
- Godot – lightweight, open-source, and pairs with Cursor or Claude for script generation
- Unreal Engine – has its own AI-assisted tooling in development; Blueprint visual scripting can be partially generated via LLM prompts (if you describe logic flow)
- Phaser (JavaScript) – perfect choice for 2D browser prototypes
- Pygame (Python) – good for quick 2D mechanic testing
- Cursor IDE – not a framework but still worth considering; it wraps your entire codebase in context, so the AI reads your project structure and writes against it. Great tool for rapid game prototyping.
If you’re still deciding which engine fits your project best, check out our detailed breakdown of Unity vs Unreal Engine.
Organizing AI memory with documentation files
Every AI coding tool works from context. The more structured and explicit that context is, the more consistent the output. You provide that context through documentation files, and you should pay extra attention to the structure of those files.
The primary file for Claude is CLAUDE.md. Here, you define the core programming requirements: architecture decisions, which patterns to follow, which to avoid, etc. You have to be extremely specific, as usually with AI tools.
A well-organized AI-assisted project includes several MD files, each covering a different type of requirements:
- CLAUDE.md – master programming rules: architecture, patterns, constraints, what the AI should never do
- ARCHITECTURE.md – system structure, how components connect, data flow, scene/module organization
- ASSETS.md – asset specifications defined in Stage 1: formats, resolutions, naming conventions, folder structure
- CODING_STANDARDS.md – language-specific rules, formatting conventions, comment requirements, variable naming
- TESTING.md – how features should be tested, what counts as passing, edge cases to account for
- UI_UX.md – interface rules, input handling standards, feedback requirements for player actions
- PROMPTS.md – a library of reusable prompts that produced good results during the sprint, so you’re not rewriting instructions from scratch every session
The logic behind this structure is simple: AI has no memory between sessions. Every time you open a new conversation with Cursor or Claude, it starts from zero. These files are how you give it the context it needs to pick up where it left off.
| Metric | Bottom Quartile | Average | Top Quartile |
| Perceived Time Savings | 1-2 hrs/week | 3-5 hrs/week | 6-10 hrs/week |
| AI Tool NPS (Net Promoter Score) | <20 | 30-40 | >50 |
| AI Suggestion Acceptance Rate | <20% | 25-35% | 35-45% |
| Post-Acceptance Edit Rate | Almost always edit | Often edit | Occasionally edit |
| Developer Satisfaction with AI Tools | Low | Moderate | High |
In practice, you reference the relevant files at the start of each session. If you are working on a new mechanic, load CLAUDE.md and ARCHITECTURE.md. For generating assets, load ASSETS.md.
For GitHub Copilot users working inside Unity or VS Code, the equivalent is a .github/copilot-instructions.md file.
What to build first?
With the tooling organized, you have to pay attention to build sequence. Start with the core mechanic and nothing else. You don’t need menus, audio, or UI beyond what’s needed to interact with the mechanic. Get the one thing your prototype exists to test working first, in the roughest possible form, and play it.
This sounds obvious, but from a psychological point of view, developers build the surrounding structure first because it gives a sense of progress. In reality, it is not.
You need to build the mechanic first and play it on day three or four. If it needs to be cut or reworked, you still have time to recover.
Pro Tip:
Don’t use AI to generate everything at once. A good AI game prototype workflow moves in layers, and each layer feeds the next.
Stage 4: Automated Testing for Prototype Validation
AI game prototyping is no different when it comes to testing than any other prototype: you have to play it. You should also do it for one simpler reason: you can replace the feeling of the mechanic unless you feel it yourself. You are in trouble, though, when the build changes every day.
You might think you need to change a few things, for example, the jump height, and now you have to replay the whole thing to make sure nothing else moved. And if these things keep piling up, you will be checking if everything is working over and over again instead of building.
So keep the manual testing, but add some automated tests underneath it. All you have to do is ask Claude Code to generate and maintain that entire layer while building the prototype itself. The point is coverage: the more of the prototype sits under automated tests, the less time you spend rediscovering old bugs.
There are three things to pay attention here:
- Unit tests cover one function at a time. You tell the AI what the function should do, and it will write the test. Your part is reading the result and confirming it, and it won’t take more than 5 minutes.
- Component tests look at whole systems. That includes combat, movement, AI behavior. In game prototype development these are the systems you rewrite most often, which is precisely why they need tests. Change a damage value on day nine and a component test will tell you within seconds if something else broke. Otherwise, you learn about it during a playtest, when the game feels off, and you can’t say why.
- End-to-end tests run a full player sequence through the build. Of the three types, these matter most, because they check your Core Question automatically, and they do it after every change.
In all three cases the division of labor is the same. The AI writes, you review and approve. You should never be writing test code by hand during a prototype sprint; if you are, the setup is wrong somewhere.
A small habit that saves issues later: whenever new test files appear, note them in PROGRESS.md. The AI starts every session blank. If it can’t see what’s already covered, it will write the same tests again, and you’ll be cleaning up duplicates instead of building.
There are a few tools for this:
- Deolpher AI runs test scenarios and surfaces issues on its own
- Modl.ai simulates thousands of player behaviors to catch bugs and balance problems
- Ghostship sends AI agents crawling through your product the way actual users would
What part of the process is it? Automated testing should definitely not be postponed until production. Simply because it is a prototyping tool. With tests generated alongside the build, you iterate on the core mechanic faster and with a written record of what works.
Pro Tip:
AI game prototyping works best when you treat AI as a junior teammate. Give it one task at a time, check the output, then move to the next. The moment you start prompting five things at once, the quality will drop.
Which Tools to Use for Different MVP Stages
Different stages of game prototype development require fundamentally different tools. Using a coding assistant at the concept stage or an image generator during the build phase wastes time, and that wasted time kills the project.
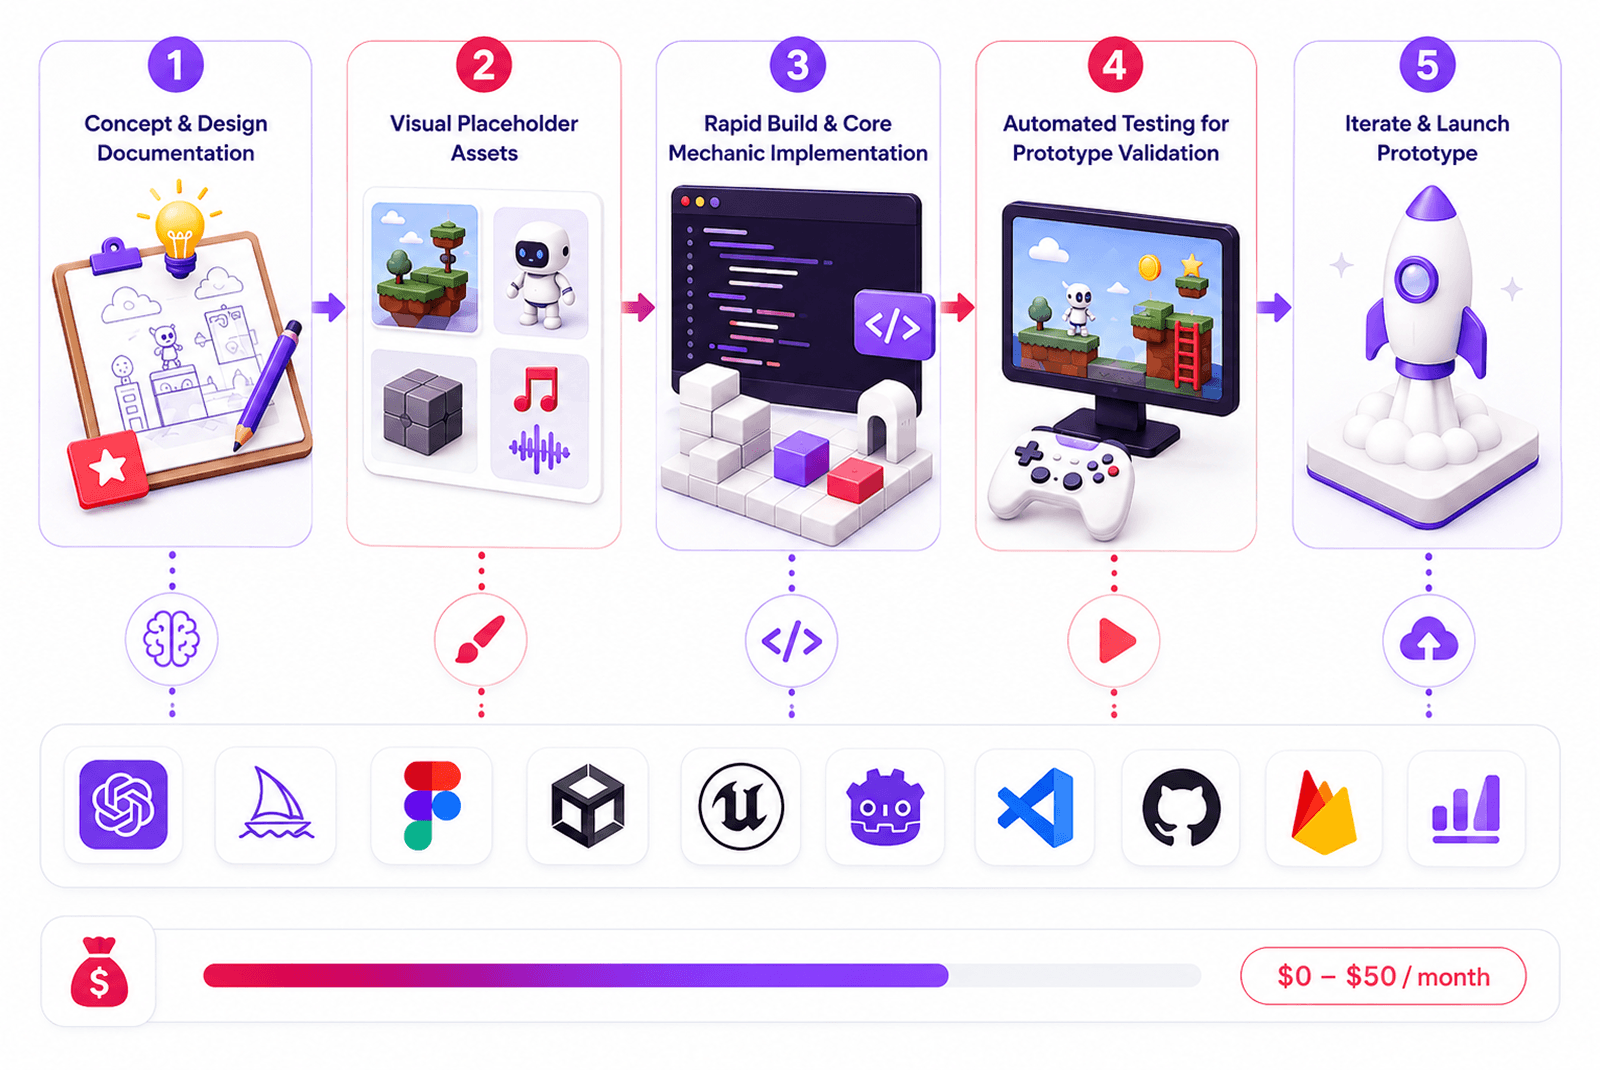
The full stack that we are covering below runs between $0 and roughly $50/month depending on which free tiers and open-source options the developer chooses. Importantly, the prices listed below come from AI tools and are subject to change. So before you start working on your game development prototype, make sure to double-check the prices.
| Prototype Stage | Goal | Recommended AI Tool(s) | Cost | Notes |
| Concept & GDD | Define mechanics, write design document | ChatGPT, Claude, Ludo.ai | Free–$20/mo | Ludo.ai adds market validation; LLMs generate GDD structure in minutes |
| Market Validation | Check genre trends, mechanic saturation | Ludo.ai, ChatGPT with web search | Free–$30/mo | Run before writing a single line of code |
| Placeholder 2D Art | Visual language, UI mockups | DALL-E 3, Layer.ai, Stable Diffusion | Free–$10/mo | Internal use only – not for shipping |
| Placeholder 3D Assets | Rough meshes for spatial testing | Meshy, Kaedim, Sloyd | Free tier–$20/mo | Meshy free plan covers basic prototype needs |
| Core Mechanic Coding | Implement playable loop | GitHub Copilot, Cursor, Claude Code | $10–19/mo | Godot or Unity – engine is free |
| No-Code Build | Full prototype without writing code | Rosebud AI, GDevelop + AI | Free–$9/mo | Best for non-technical founders |
| Placeholder Audio | Temp SFX and music | ElevenLabs, Suno, Meta AudioCraft | Free–$5/mo | AudioCraft is fully open-source and free |
| Playtest Design | Observation criteria, feedback surveys | ChatGPT, Claude | Free | Generate 5 behavioural criteria from your Core Question in one prompt |
There’s no project that needs every single tool we have just mentioned. You need to choose only what is relevant to you based on the current stage of product development.
Did You Know?
The original prototype for Minecraft was called “Cave Game” and Markus Persson built it in six days in May 2009. That rough prototype was just block-breaking in an empty world! This is just one more proof that game prototyping doesn’t need to be polished.
Common Mistakes in AI-Assisted Game Prototyping
AI is an extremely helpful addition for every developer’s instruments, but we have to remember that artificial intelligence generally is a new technology. That means one thing: mistakes happen. Let’s take a look at the most common ones:
Prototyping the wrong thing: One of the most common and unforgivable mistakes in terms of cost. Game design prototyping often starts from building UI or visuals in parallel with other work. But if it’s done before a team validates the core mechanic loop, it can affect everything and force you to make the same work twice.
Over-relying on AI-generated code: AI is a tool, but it can’t replace people’s skills and understanding of the final results. And it should be treated in that way. You can’t just accept Copilot/Cursor output without understanding the logic and without correcting it. In that case, it’s nothing but a gambling, and your game development prototype will suffer from that.
Skipping playtesting: an AI-generated build is only after you validate it with a real user. The whole idea of rapid prototyping game development is in faster delivery of a prototype. But it doesn’t mean you have to skip what users have to say.
Scope creep: AI can make many things feel possible, and some developers might start adding features because AI makes it faster. This is not a good idea for prototyping games, because not only it wastes time, it also can blur the whole focus of your prototype and make it useless. It is important to consider an AI game prototyping just another tool and stay within the boundaries of your particular goals.
Conclusion
Game prototyping has always been the most effective way to validate a game idea. Now, it is also the most cost-effective and quick way if you are using AI tools, and do that in the right way.
If you get MVP scoping, a proper set of AI tools for each stage, and open-source alternatives together – you will have a rapid prototyping game development workflow. All of it is very inexpensive and might cost you under $50 a month if you’re paying for everything. But it can also be somewhere closer to zero if you lean on open-source.
| Score Range | Interpretation | Typical Profile |
| 0–30 | Early Stage | Low adoption, minimal AI code share, no quality baseline established |
| 30–50 | Developing | Moderate adoption, some AI-assisted code, quality not yet tracked systematically |
| 50–70 | Maturing | Strong adoption, significant AI code share, quality actively monitored |
| 70–85 | Advanced | High adoption, deep AI integration across workflows, quality healthy, ROI proven |
| 85–100 | Elite | AI-native workflows as default, comprehensive measurement across all pillars, continuous optimization |
Table showing AI adoption maturity levels for game developers, from Early Stage (score 0–30, minimal AI use) to Elite (score 85–100, AI-native workflows across all development pillars).
It is important to remember that your goal is not a perfect build that requires polishing. You just need to extract a quick and detailed answer to a specific gameplay question. And you can have that when you game prototype with AI.
If you approach it correctly, video game prototyping will be accessible to you without enterprise-level budgets as a solo developer or a part of a small studio.
The same creative freedom is what drives the best indie games and shows how small teams with strong idea, executed well, beats budget every time.
FgFactory is a full-cycle game development studio with hands-on experience in early-stage game prototype development and AI-accelerated pre-production. The team works with indie developers, funded startups, and mid-sized studios at any stage, including pre-production, when the idea is still taking shape.
Have a game idea that needs validation? Contact Fgfactory for a free consultation on your prototype development plan.

Contact us